
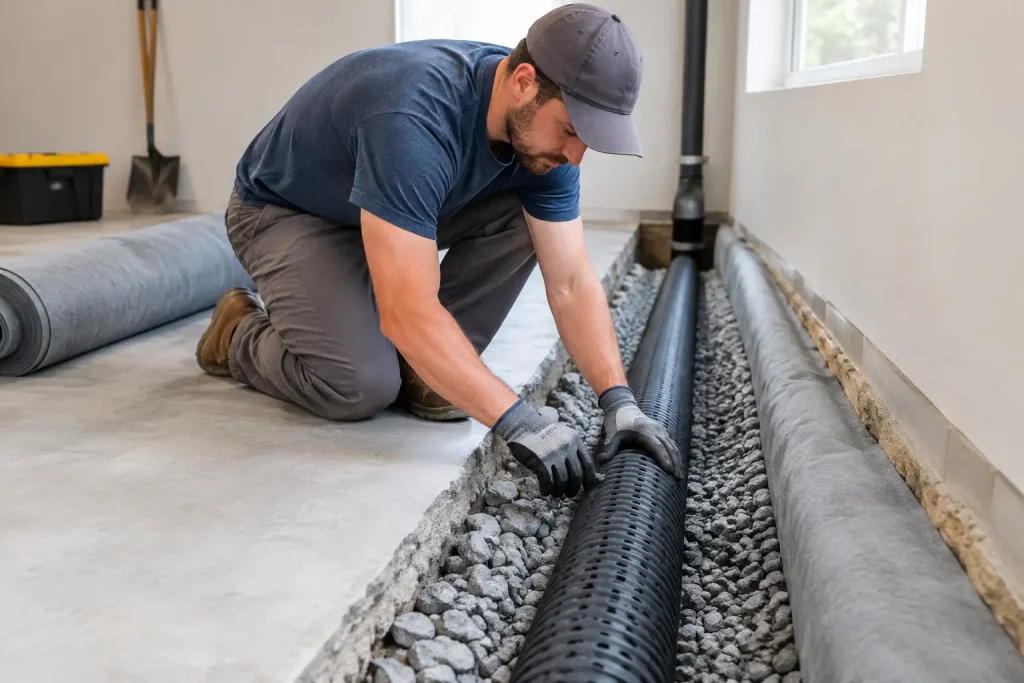
A damp line around the edge of a basement floor, water appearing where the wall meets the slab, or a sump pump that cannot keep up during a New Jersey storm all point to the same area: the foundation perimeter. Interior drain tile installation steps are designed to collect groundwater at that pressure point and move it safely out of the home before it can spread across the floor, feed mold, or damage finished space.
An interior drain system is often called a French drain, but the “tile” is typically a perforated drainage pipe. It is installed beneath the basement floor along the foundation footing, surrounded by clean stone, and directed to a sump basin. The process is proven, but the details matter. A drain that is too shallow, lacks stone, is installed without a proper outlet, or is covered in a way that restricts water flow can leave a homeowner with the same problem after a major rain.
Why the Work Starts With a Basement Assessment
Before any concrete is cut, the contractor should identify how and where water is entering. Some basements take on groundwater through the cove joint, which is the gap between the wall and floor. Others have cracks, window well leaks, failed exterior drainage, plumbing leaks, or a combination of issues. An interior perimeter drain is highly effective for groundwater pressure, but it is not a substitute for repairing an active plumbing leak or correcting a roof drainage problem that is dumping water beside the foundation.
A thorough assessment also considers the foundation type, finished walls, utilities, existing sump equipment, floor condition, and the location of the footing. In older New Jersey homes, conditions vary widely from one basement to the next. A clear plan should explain where the drain will run, whether the full perimeter needs protection, where the sump basin will go, and how the discharged water will be carried away from the home.
Interior Drain Tile Installation Steps, From Floor to Outlet
The work can create temporary dust and noise, but an experienced in-house crew will contain the work area, protect accessible surfaces, and keep the site organized. Here is what a properly planned installation generally involves.
1. Mark the drainage route and protect the workspace
The crew marks a narrow channel around the affected basement perimeter, usually close to the foundation wall. The route must account for structural columns, stairs, water heaters, finished areas, and utility lines. If the project includes a sump pump, the basin location should be accessible for future service without creating an obstacle in the basement.
Dust control is not an afterthought. Cutting concrete generates fine dust, so professional crews use appropriate containment and collection methods. Homeowners should also know in advance whether stored belongings need to be moved and whether finished wall materials must be removed near the floor.
2. Cut and remove the concrete floor
A section of slab is saw-cut and broken out to create the trench. The concrete is removed rather than buried in the excavation. This allows room for the drainage stone and pipe that make the system work.
The width and depth depend on the basement construction and drainage design. The goal is to reach the area alongside the footing where groundwater can be intercepted, without undermining the foundation. This is one reason the job should not be treated as a simple trenching project. Digging too deeply or carelessly around a footing can create unnecessary structural risk.
3. Excavate beside the footing and prepare the trench
After the slab is removed, soil is excavated along the foundation edge. The trench is cleaned and brought to the correct grade so water will move toward the sump basin or designated discharge point. In many systems, a layer of clean, washed drainage stone is placed in the bottom of the trench before the pipe is set.
Washed stone creates open spaces for groundwater to travel. Soil, construction debris, and dense fines can clog those spaces over time. The material beneath and around the pipe is every bit as important as the pipe itself.
4. Install the perforated drain pipe and drainage stone
The perforated pipe is laid continuously along the trench. Its perforations allow groundwater to enter from the surrounding stone. The pipe is then covered with more clean stone, creating a drainage zone that captures water entering at the wall-floor joint and below the slab.
The pipe must remain properly supported and pitched toward the collection point. Sharp turns, crushed pipe, gaps, or an uneven trench can restrict flow. A quality installation is not about putting pipe in the ground quickly. It is about building a clear, dependable path for water under real storm conditions.
5. Connect the system to a sump basin and pump
Most interior systems direct water into a sump basin. The basin is set into the floor at the low point of the system and fitted with a reliable sump pump sized for the home’s expected water volume. The pump sends collected water through a discharge line to a location outside where it will not return to the foundation.
This is a critical part of the design. A new drain line will not solve a water problem if the sump pump is undersized, the discharge line is blocked, or the outlet empties too close to the house. In areas prone to power outages during heavy weather, homeowners may also choose a battery backup pump for added protection.
6. Provide a wall drainage path where needed
If water is entering through the foundation wall or down the wall to the cove joint, the system may include a wall drainage membrane. This material is installed at the lower portion of the wall to guide water behind it into the new interior drain. It is especially useful when a foundation wall has recurring seepage or when old wall finishes are being removed as part of the project.
A membrane manages water that reaches the interior side of the wall. It does not make a foundation crack disappear. Significant cracks, bowing walls, or other structural concerns may require separate foundation repair before or alongside waterproofing work.
7. Restore the concrete and test the system
Once the pipe, stone, and connections are in place, the trench is restored with new concrete. The finished patch should be secure and neatly integrated with the existing floor while preserving the intended path for water at the perimeter.
Before the crew leaves, the pump and drainage route should be tested. Homeowners should understand where the pump plugs in, how to check its operation, and where the discharge exits outdoors. Clear communication at this stage makes future maintenance much easier.
What Can Change the Scope of an Interior Drain System?
Not every basement needs the same layout. A home with a single wet corner may need a targeted drain run, while a basement with water along multiple walls may benefit from a full perimeter system. The right choice depends on the source of water, the soil conditions, the layout of the basement, and the homeowner’s plans for the space.
Finished basements require additional decisions. Removing lower drywall and insulation may be necessary to access the wall and prevent hidden mold from remaining behind new finishes. If the basement will be renovated later, it is often wise to address drainage, sump capacity, cracks, and humidity control before investing in flooring, walls, and furniture.
An interior drain system also works best as part of a complete moisture-control plan. Gutters should carry roof water away from the house, grading should slope away from the foundation, and the sump discharge should not recirculate water toward the basement. These exterior details can reduce the amount of water the interior system must manage.
Questions to Ask Before Hiring a Contractor
A trustworthy contractor should be able to explain the proposed drainage route in plain language and tell you why that design fits your basement. Ask who will perform the work, how dust and cleanup will be handled, what happens if foundation issues are discovered, and how the system will be serviced after installation.
It is also reasonable to ask about the warranty in writing. A long-term waterproofing solution should come with long-term accountability. A-1 Basement Solutions uses trained, in-house crews and backs qualifying work with a transferable Life-of-the-House Guarantee, so homeowners can make decisions based on a clear scope of work instead of pressure.
A dry basement begins with a system that gives water somewhere else to go. When the installation is designed around your home rather than a one-size-fits-all fix, you gain more than a cleaner floor after the next storm. You gain a basement you can use and protect with greater confidence.