
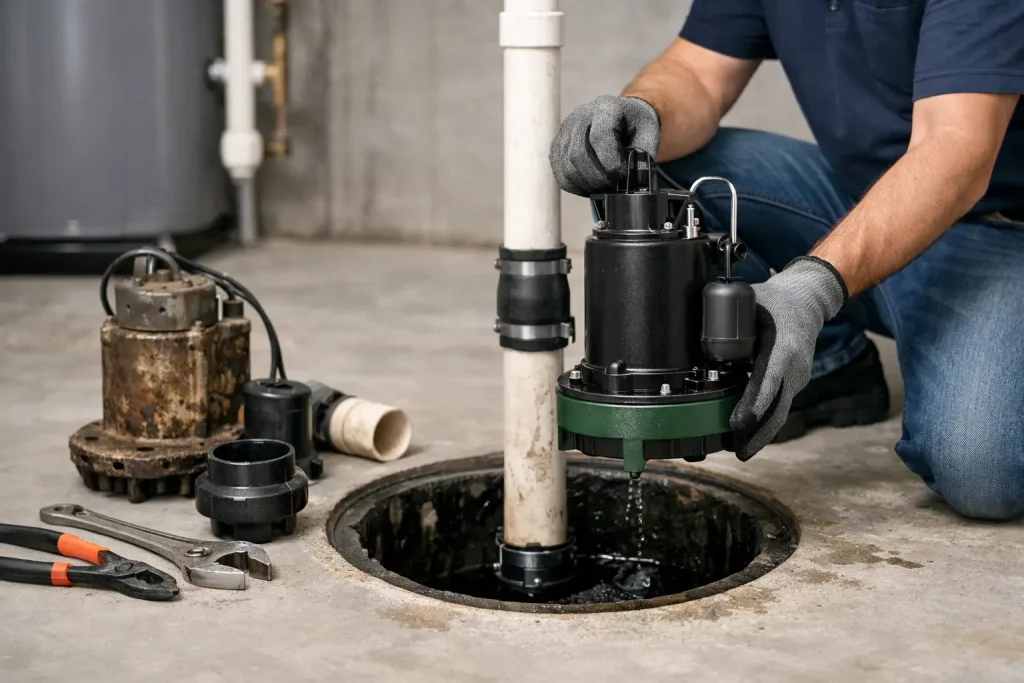
A sump pump usually picks the worst possible time to fail – during a heavy storm, after days of rain, or when groundwater is already pressing against your foundation. If you are searching for how to replace sump pump equipment, chances are you are trying to prevent that kind of problem before it turns into water on the floor, damaged belongings, or a bigger waterproofing issue.
The good news is that replacing a sump pump is often straightforward if the setup is simple and accessible. The part many homeowners underestimate is that the pump is only one piece of the system. The pit condition, check valve, discharge line, power source, and backup protection all matter. If one of those pieces is failing too, a new pump alone may not solve the problem.
When sump pump replacement makes sense
Most sump pumps do not fail all at once without warning. They usually get noisy, cycle too often, run continuously, or stop keeping up during moderate rain before they quit entirely. Age matters too. If your pump is around seven to ten years old, replacement is often the safer move, especially if your basement has a history of water intrusion.
You may also need to replace the pump if the float switch sticks, the motor overheats, or rust and debris are affecting performance. In some homes, the issue is not the pump itself but an undersized unit that was never a good match for the amount of groundwater around the foundation. That is where a quick swap can turn into a more important conversation about the whole drainage system.
Before you replace it, confirm the real problem
Before learning how to replace sump pump equipment, take a minute to make sure the pump is actually the problem. A tripped breaker, blocked discharge pipe, frozen exterior line, failed check valve, or jammed float can mimic pump failure. If the basin is full but the motor hums without moving water, the impeller may be clogged or damaged. If the pump runs but water returns to the pit, the check valve may be installed incorrectly or no longer sealing.
This matters because replacing a pump when the discharge line is blocked will not protect your basement. It just gives you a new pump fighting the same restriction.
How to replace sump pump step by step
If the basin is accessible and the plumbing is not heavily modified, many homeowners can handle a basic replacement. Start by cutting power to the pump. Unplug it if possible, and if the outlet is hard to reach or the area is damp, shut off the circuit first. Water and electricity are not a combination to rush through.
Next, clear enough space around the pit to work safely. If the basin is full, you may need to let the pump remove what it can before disconnecting it, or carefully remove water with another method. Once the water level is manageable, disconnect the old pump from the discharge pipe. In many systems, this means loosening a clamp or separating a union fitting above the check valve.
Lift the old pump out carefully. It may be heavier than expected, especially if it is a cast iron unit or covered with sediment. Set it on a towel or tray so you do not spread dirty pit water across the basement floor.
Now inspect the basin before dropping in the new unit. This is the step that gets skipped too often. Remove loose debris, sludge, gravel, or anything that could interfere with the float. Check that the pit liner is intact and that the pump will sit level on the bottom or on a proper pump stand if the manufacturer recommends one. A pump that tilts or sits directly in heavy sediment will not last as long.
Install the new pump according to the manufacturer instructions. Attach the discharge pipe, confirm the check valve is oriented the right way, and make sure the float switch has room to move freely without hitting the side of the basin, the pipe, or the lid. If you are replacing a pedestal pump with a submersible unit or changing pipe sizes, the job may require more plumbing adjustments than a simple like-for-like swap.
Once everything is connected, restore power and test the pump. The best way is to slowly add water into the pit until the float activates. Watch the full cycle. The pump should turn on, remove water efficiently, and shut off at the proper level. Also check for leaks at fittings and listen for any unusual vibration or rattling.
Choosing the right replacement pump
Not every sump pump is interchangeable. Horsepower, switch style, basin size, vertical lift, and discharge pipe size all affect performance. More power is not always better. A pump that is too strong for the basin may short cycle, turning on and off too often, which can shorten motor life.
For many New Jersey homes, a quality submersible pump is the preferred choice because it is quieter, sealed against moisture, and generally better suited for finished or frequently used basement spaces. Pedestal pumps can still make sense in some unfinished areas because they are easier to service and often cost less, but they are louder and more exposed.
Material quality matters too. Thermoplastic pumps can work in lighter-duty applications, while cast iron models usually offer better durability and heat dissipation. If your basement has flooded before or your home depends heavily on the sump system, this is not a place to buy the cheapest option and hope for the best.
Common mistakes that cause trouble later
The biggest mistake is focusing only on the pump and ignoring the system around it. Homeowners sometimes install a new pump but reuse a failing check valve, leave a partially blocked discharge line in place, or choose a pump that does not match the home’s water volume.
Another common issue is poor float clearance. If the switch catches on the basin wall or pipe, the pump may never activate or may run nonstop. Both can lead to failure. Loose fittings, undersized piping, and extension cords are also red flags. A sump pump should have a reliable, properly grounded power source, not a temporary setup.
There is also the backup question. If your primary pump failed because of age, and you do not have a battery backup or water-powered backup, you are still one outage or one bad storm away from a wet basement. Replacement is a good time to think beyond the immediate repair.
When to call a professional instead of doing it yourself
Some replacements are simple. Others are signs of a larger basement water management problem. If the pit is undersized, the discharge route is questionable, the basin fills unusually fast, or the pump runs constantly even in moderate weather, the pump may not be the core issue.
The same is true if you see repeated moisture on walls, floor seepage away from the pit, musty odors, or signs that your interior drainage system is overwhelmed. In those cases, replacing the pump helps only part of the problem. A professional inspection can tell you whether the home needs a pump upgrade, a new drain tile connection, a better discharge layout, or a full waterproofing solution.
That is where working with a company that focuses on basement systems, not just quick repairs, can save money and frustration over time. At A-1 Basement Solutions, the right answer is never based on pressure. It is based on what will actually keep the basement dry and the home protected.
How to make the new sump pump last longer
Once you replace the pump, a little maintenance goes a long way. Test it periodically by adding water to the pit. Listen for changes in sound. Check that the discharge line is draining properly outside and that the outlet is not blocked by debris, snow, or ice. If your system has a battery backup, test that too.
It also helps to keep the pit covered when possible, especially in homes with dust, pets, or unfinished basements where debris can find its way into the basin. A clean pit reduces clogging and helps the float move freely. Routine attention is much easier than finding out the system failed during the next storm.
If you are deciding how to replace sump pump equipment in your home, think of the job as more than swapping one box for another. The goal is not simply to get the motor running again. The goal is to make sure the basement has dependable protection when water pressure rises and your home needs it most.